Gifting has never been easier
Perfect if you're short on time or are unable to deliver your gift yourself. Enter your message and select when to send it.

Installing a dimmer switch is an easy and impactful way to control the lighting in your home, giving you the power to create the perfect atmosphere for any occasion. In this step-by-step guide, Rowabi will show you how to install a dimmer switch, even if you’re not a seasoned DIYer.
With just a few tools and a little bit of effort, you can take your home’s lighting to the next level. Ready to make your space more inviting to the visitors? Let’s go straight into the article!
Dimmer switches are an excellent tool for adjusting the brightness of your lights, helping you create the ideal ambiance for any occasion. They allow you to customize lighting levels to fit your needs, whether you're setting a cozy mood for a movie night or brightening up a space for reading.
Additionally, dimmer switches can reduce energy consumption and extend the lifespan of your light bulbs, making them a practical and energy-efficient choice for any home. There are several types of common dimmers:
Rotary dimmers feature a circular knob for adjusting light levels, offering a wide dimming range from 0% to 100%. Ideal for residential spaces like bedrooms, living rooms, and dining rooms, these dimmers are versatile and compatible with various bulb types.

Rotary dimmers have become a popular choice in recent years due to their convenience and ease of use. Source: Forbes & Lomax (1)
They are one of the most affordable options, but they can generate significant heat when used with incandescent bulbs.
Slide dimmers provide precise control over illumination with a vertical slider, making them perfect for modern homes. They support a wide dimming range and are suitable for spaces like living rooms and bedrooms.

Slide dimmers allow precise control over light levels, making it easy to set the exact brightness you need. Source: iStock (2)
Their contemporary look adds sophistication, and while they are moderately priced, they can produce high heat when paired with incandescent bulbs.
Touch dimmers allow light adjustment with a tap or swipe, offering a seamless and modern lighting experience. They support a wide dimming range and are ideal for living rooms and bedrooms.
Although more expensive due to advanced technology, their energy efficiency varies with the bulb type, and they can generate high heat if used with incandescent bulbs.
Smart dimmers are Wi-Fi-enabled and controllable via smartphones or voice assistants. They offer a wide dimming range and allow for personalized lighting schedules and scenes, making them ideal for home automation, kitchens, and bathrooms.

You can control your lights without even being in the same room, or even when you’re away from home. Source: Shutterstock (3)
Smart dimmers are highly energy-efficient, especially with LED bulbs, and generate minimal heat, but come with a higher upfront cost.
Three-way dimmers enable lighting adjustments from two locations, providing convenience in large rooms, hallways, and staircases.
They typically support a wide dimming range and their efficiency varies based on the bulb type. These dimmers are moderately priced, with costs depending on specific features.
Installing a dimmer switch can enhance your home’s lighting, but safety must always come first. Here are crucial steps to ensure a safe and successful installation.

Before diving into installing a dimmer switch, make sure to prepare the following. Source: Express Tech Electrical (4)
Before you start installing your dimmer switch, it's important to gather all the necessary tools and materials. Here's a list to ensure you have everything ready, along with an estimate of the time it will take to complete the project and the potential cost.

Here are the tools you need to successfully install a dimmer switch. Source: The Spruce (5)
Time to complete: Around 30 minutes to 1 hour
Cost: Around $20 to $50
Installing a dimmer switch can enhance your home’s lighting, allowing you to create the perfect ambiance. Follow these detailed steps for a safe and successful installation.
Choose your perfect dimmer: Select a high-quality dimmer that seamlessly harmonizes with your bulbs and wattage. Opt for a dimmer designed specifically for your bulb type, ensuring optimal performance. Consider smart capabilities or remote control options for added convenience and flexibility.

Choose a dimmer switch that meets your needs and integrates seamlessly with your home. Source: Shineretrofits (6)
Prioritize safety by turning off the power: Confidently locate your circuit breaker panel and switch off the power to your target light switch. Use a non-contact voltage tester to verify complete power disconnection, ensuring a safe working environment.
Remove faceplate and test current: Carefully remove the existing faceplate and double-check for electrical current absence. This crucial step confirms your safety as you proceed with the installation.
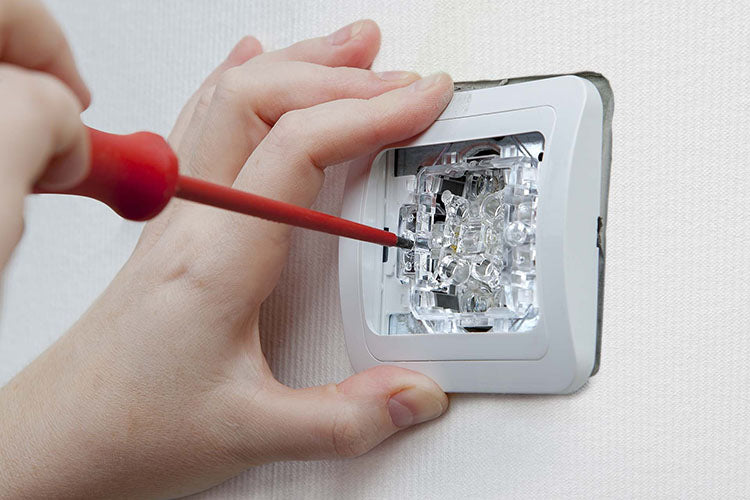
Always double-check each step before proceeding to the next during the installation process. Source: Checkatrade (7)
Label wires: Before disconnecting any wires, apply clear labels using electrical tape or wire markers. This thoughtful preparation ensures accurate reconnection, making your installation process smooth and effortless.

Be sure to securely mark each wire for clarity and safety. Source: Reddit (8)
Disconnect wires: Gently unscrew and detach wires from the old switch, using needle-nose pliers for stubborn connections. Keep wires separated to prevent accidental contact, showcasing your attention to detail and safety.
Connect your new dimmer: Follow the manufacturer's instructions to connect labeled wires to the corresponding terminals on your new dimmer. Secure all connections with wire nuts and wrap them with electrical tape, ensuring a safe and reliable installation.
Slide dimmer switches into position: Carefully arrange wires in the electrical box, preserving your meticulous connections. Align your new dimmer switch with mounting holes and secure it firmly. Attach the new faceplate for a polished, professional finish.

Install the dimmer switch securely and complete the installation. Source: Better Homes & Gardens (9)
Turn on electricity and test the switch: Confidently restore power at the circuit breaker panel. Test your newly installed dimmer by adjusting brightness levels, enjoying smooth operation and enhanced control over your lighting ambiance.
Welcome to Rowabi, where our exquisite pendant lights redefine your spaces into enchanting retreats. Situated in Houston, Texas, Rowabi is a beloved family-owned business with nearly five years of expertise in crafting exquisite, top-tier lighting solutions.
At Rowabi, we uphold a legacy of meticulous craftsmanship and the use of premium materials. Each piece undergoes rigorous modeling and comprehensive testing to meet our stringent standards for durability and longevity.
Discover our unparalleled selection of rattan and modern pendant lights, designed to elevate any setting with the elegance and functionality that defines Rowabi's commitment to excellence.
Can you make any pendant light dimmable?
Can you put a dimmer switch on any light fixture?
How to change a regular light switch to a dimmer?
How to make a light fixture dimmable?
What happens if you put a dimmer switch on a non-dimmable light?
Why would a light fixture not be dimmable?
Do I need an electrician to install a dimmer switch?
How do I know if my light fixture is dimmable?
Can you put a dimmer switch on any light socket?
Is it hard to install a dimmer switch?
Do you need special light bulbs for dimmer switches?
How much does it cost to install a dimmer switch?
Can I make my LED light dimmable?
Can you put a dimmer switch on LED lights?
By following these steps of Rowabi, you’ve taken control of your home’s lighting, allowing you to create the perfect ambiance for any occasion. The new dimmer switch will enhance your days and nights, providing a pleasant and customizable lighting experience.
Remember, if you ever feel unsure, don’t hesitate to consult a professional electrician to ensure everything is safely and correctly installed. Now, enjoy the flexible lighting options you’ve created – your home just got a lot cozier and more stylish!
Source:


How to Hang a Pendant Light Cord in 8 Easy Steps
Ready to bring some summer vibes into your space and add a splash of personality? Hanging a pendant light cord is your chance to brighten up any room with style and flair, all by yourself! No need ...
Read more
How To Hang a Pendant Lamp Without Hard Wiring [Update 2024]
Are you looking to install stylish and fresh pendant lamps for the summer, but the idea of hard wiring feels intimidating? Especially for renters or anyone seeking a simpler installation process, h...
Read more
Leave a comment
This site is protected by hCaptcha and the hCaptcha Privacy Policy and Terms of Service apply.