Gifting has never been easier
Perfect if you're short on time or are unable to deliver your gift yourself. Enter your message and select when to send it.

Changing a light fixture without hiring an electrician might seem like a daunting task best left to professionals, but it doesn’t have to be! If you’re tired of staring at that outdated, boring fixture that does nothing for your space, now’s the time to take matters into your own hands.
Plus, who doesn't love the satisfaction of DIY success? With just a few simple tools and a bit of guidance from Rowabi, you can transform your room's ambiance in no time. Ready to shine a light on this project? Let’s dive in!
Changing a light fixture can be a straightforward DIY project that saves you money and gives your space a fresh look. With the right tools and a little guidance, you can tackle this task safely and effectively. Here's how to do it.

Changing a light fixture is essentially a process that requires following specific steps to ensure success. Source: The Spruce (1)
Gather these tools and materials to ensure the entire process goes smoothly and quickly:

Make sure you have all the necessary tools and materials ready during the process. Source: House Beautiful (2)
There are a total of 9 steps that you need to remember, including the order and the method for each task.
Start by locating your home’s electrical panel. Switch off the circuit breaker that controls the light fixture you’ll be working on. If you’re unsure which circuit to turn off, you may need to test a few. Use a voltage tester to confirm that the power is off before proceeding.

Ensure the power is turned off to maintain safety during the installation process. Source: The Spruce (3)
Remove any detachable components from the fixture, such as light bulbs or decorative covers. Look for a canopy or decorative plate concealing the mounting hardware. Unscrew this to access the wiring.
With the decorative parts removed, you should see the wiring connected to the fixture. If you’re uncertain at this stage, it’s safer to consult a professional. Carefully unscrew the wire caps and use the voltage tester on the exposed wires to ensure there’s no power. Take a picture or make a note of how the wires are connected.
Ensure the chandelier is supported by a ladder and a helper. Unscrew the mounting bracket from the ceiling fixture box and lower the chandelier carefully. Take a moment to celebrate your progress!

To keep the light fixture secure and intact, it's essential to have an extra helper. Source: Adobe (5)
If you’re installing a new hanging fixture, measure how low you want it to hang. A chandelier over a dining table should ideally be 30 to 34 inches above the surface. Adjust the length of the wires accordingly, adding an extra 8-10 inches, and strip about an inch of insulation from each wire.
Attach the new mounting plate included with your new fixture. Make sure to thread the wires through the plate so they are ready for reconnection.
Connect the fixture wires to the ceiling wires, matching colors: white to white, black to black, and ground wire to ground wire. Use wire connectors to secure the connections.
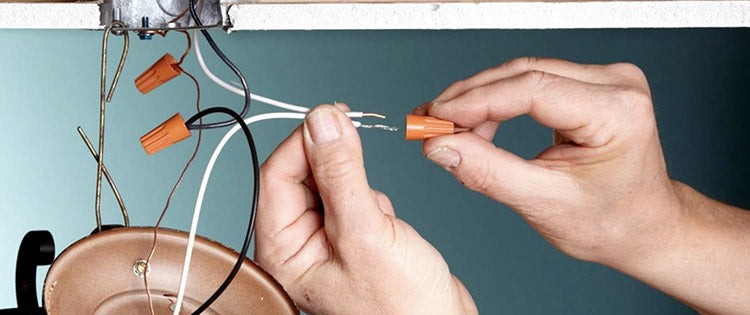
For the light fixture to function properly over time, the wiring connections must be correct. Source: Penna Electric( 5)
Carefully push the wires back into the electrical box and assemble your new light fixture according to the manufacturer’s instructions. Don’t forget to install the light bulbs!
Once everything is securely in place, return to the electrical panel and switch the circuit breaker back on. Test your new fixture to ensure it’s working properly.
While replacing a light fixture can seem like a straightforward DIY task, there are several compelling reasons to consider hiring a professional instead. Here’s a breakdown of the key factors that may lead you to avoid tackling this project on your own.
One of the most significant hurdles in replacing a light fixture is the need to rewire it properly. This involves understanding the existing wiring system and ensuring that the new fixture is compatible.
Improper wiring can lead to malfunctions or even electrical fires, making having the right knowledge and tools crucial. Professionals are trained to handle these tasks safely and efficiently.
Attempting a DIY installation can often result in unintentional damage to the fixture or surrounding areas. Accidental scratches, dents, or even damage to the electrical components can occur if proper care isn't taken. Professionals have the experience to navigate these risks and minimize the potential for damage, preserving the integrity of your home and new fixtures.

There can be many unforeseen accidents that are difficult to anticipate. Source: Elesi (6)
Working with electricity poses inherent dangers, including the risk of electrocution. If you're not experienced in electrical work, it can be easy to make a mistake that puts you in harm’s way. A licensed electrician is trained to handle these risks, ensuring that all safety protocols are followed to protect you and your home.
Certain light fixtures, especially heavy chandeliers, require proper structural support to ensure they hang safely. DIY enthusiasts may not assess the structural integrity of the mounting point accurately, potentially leading to hazards if the fixture were to fall. Professionals understand how to evaluate these factors and can install fixtures securely.
The height at which a fixture hangs is crucial for both functionality and aesthetics. Incorrect installation can lead to lights that are too high or too low, impacting their effectiveness and appearance. An electrician will know the standard heights for different types of fixtures and can ensure that your new installation meets those standards.

Ensure that the spacing between the lights is precise and accurate. Source: Cedar & Moss (7)
Installing outdoor lighting comes with additional challenges, such as weatherproofing and wiring considerations. Outdoor fixtures often require special attention to prevent moisture intrusion and other environmental factors.
Professionals are equipped with the knowledge to install outdoor lights correctly and safely, ensuring they withstand the elements.
Many light fixtures come with warranties that may be voided if not installed by a licensed electrician. Additionally, the National Electrical Code (NEC) sets regulations for electrical installations to ensure safety.
Professionals are familiar with these codes. They can ensure that your installation complies, safeguarding both your investment and your home.
Do I need an electrician to change a light fitting?
Is it difficult to change a light fixture?
Do I need to turn off the breaker to change the light fixture?
Is it safe to replace a light fixture yourself?
Is it illegal to change a light fitting?
How much does an electrician charge to change light fittings?
How much will an electrician charge to change a light switch?
Is changing a light fixture considered electrical work?
How long does it take an electrician to change a light switch?
By following the outlined steps from Rowabi—turning off the power, carefully detaching the old fixture, and properly connecting the new one—you can successfully update your lighting and enhance your space.
Remember, while DIY projects can save money, prioritizing safety is crucial. If you encounter any complexities or uncertainties during the process, don’t hesitate to consult a professional.
Source imgae:


15+ Wood Pendant Lights Ideas and Inspiration in 2024
Wood pendant lights have surged in popularity, becoming a go-to choice for those seeking a perfect blend of aesthetic charm and functional illumination. However, some people still harbor concerns r...
Read more
Do the Light Fixtures Need to Be Grounded? And How Do I Ground Them?
Are you wondering if your light fixtures need to be grounded? Don’t worry, you’re not alone! Grounding your lights may sound complicated, but it’s actually a straightforward step that ensures safet...
Read more
Leave a comment
This site is protected by hCaptcha and the hCaptcha Privacy Policy and Terms of Service apply.