Gifting has never been easier
Perfect if you're short on time or are unable to deliver your gift yourself. Enter your message and select when to send it.

Cart
Your cart is empty
Looking to add some stylish wall sconces to your home but dreading the hassle of wiring? You’re not alone! The idea of tearing up walls, dealing with electrical work, and facing a hefty bill can make anyone think twice.
But what if we - Rowabi told you there’s a way to enjoy beautiful wall lighting without any of the mess or stress? Say goodbye to complicated installations and hello to easy, no-wiring-needed solutions that will light up your space in no time!
| Difficulty | Time to complete | Cost |
| Easy | 45 minutes | $50 to $100 |
When it comes to installing lights without wiring, especially wall sconces, preparation is key to ensuring that both style and functionality are achieved. Here's how to get started:
Choose the perfect wall sconce
Finding the right wall sconce isn't just about personal taste; there are a few technical factors to consider as well. Opt for a sconce with a shade wide enough to fit a puck light inside. This will allow you to use a wireless light source without compromising on appearance.
Additionally, check that there is sufficient surface area inside the sconce base for securely attaching the puck light.
Select the right puck lights
Puck lights are small, battery-operated, and typically around 2.5 inches in diameter, making them a practical solution for wireless sconces. When selecting puck lights, look for key features that suit your needs, such as remote control capabilities, dimmable settings, or color-changing options.
A remote control is especially important because, without wiring, you won't have a traditional wall switch to operate the lights. Remote-operated puck lights make it easy to turn the lights on and off without hassle.

Choose a puck light that complements the fixture you plan to install . Source: The Nurtured Home (1)
Consider practicality and performance
Puck lights come with different lifespans and battery durations, so it's worth researching how many hours of light you’ll get per battery cycle before making a purchase. Choosing long-lasting puck lights will minimize the frequency of battery changes and ensure consistent lighting for your sconces.
Features like timer systems can also help preserve battery life, allowing you to set the lights to automatically turn off after a certain period.
Tips when choosing:
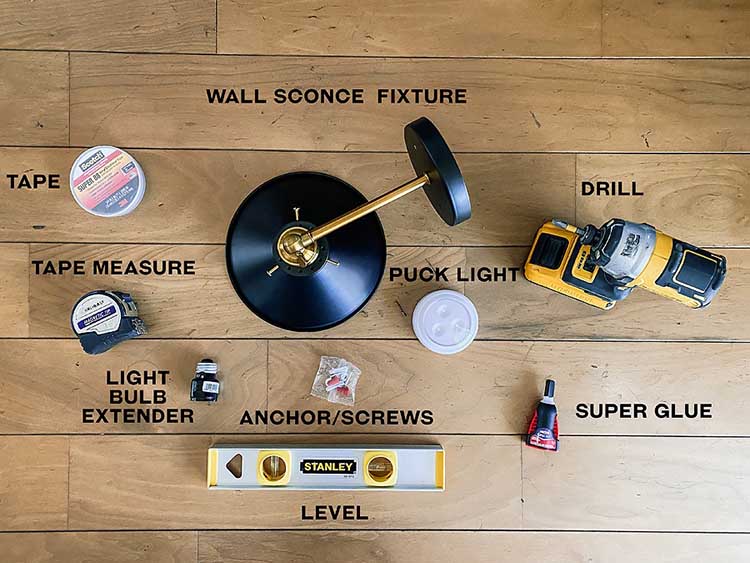
With these tools and supplies, you’ll be well-equipped to install your wall sconces effortlessly without the need for hardwiring.

Get these tools and materials ready first before installing. Source: The Nurtured Home (2)
Here's a comprehensive guide to help you install wall sconces on your own, using puck lights for a simple, wireless solution.
When selecting a wall sconce for a DIY installation, it's important to consider both aesthetics and functionality. Opt for a sconce with a wide enough shade to comfortably fit a puck light inside.
Opaque sconces are ideal because they hide the puck light, creating a seamless look. Additionally, ensure the base of the sconce is wide enough to securely attach the puck light, as this will prevent any shifting or falling.
Proper placement is key to achieving the desired lighting effect. Decide where you want to install the sconce, considering whether you want the light to bounce off the walls and ceiling or focus on a specific task area like a table or chair.

Measuring accurately will help avoid many mistakes during installation. Source: The Spruce (3)
Once you've chosen the spot, hold the sconce against the wall and use a pencil to trace around the mounting plate. If you're installing multiple sconces, this step ensures they are evenly spaced and aligned.
Since you’re opting for a wireless setup, you’ll need to remove any unnecessary wiring from the sconce. Start by disassembling the stool to access the mounting plate.

Ensure there are no unnecessary wiring connections. Source: allisa jacobs (4)
Carefully cut away any wires, leaving a clean surface for the puck light. If the sconce has wires that can’t be fully removed, you can tuck them away inside the mounting plate or trim them down as needed.
Now it's time to secure the mounting plate to the wall. Most sconces come with screws and instructions for this step. For a sturdy installation, consider using self-tapping screws, which easily penetrate various surfaces like wood, brick, or metal.
After the mounting plate is attached, reassemble the sconce, making sure everything is securely in place.
Before attaching the puck lights, ensure they are working correctly and have fresh batteries. Peel off the backing from the puck light’s adhesive and stick it inside the sconce shade.

Secure the puck lights to the fixture once it is installed. Source: Sengerson (5)
For extra security, you can use additional tape or adhesive strips. Make sure the light is positioned in a way that it illuminates the space effectively without being too visible.
If there are any leftover wires from the sconce, make sure to tuck them neatly inside the mounting plate. This not only ensures a clean look but also prevents any wires from interfering with the puck light or the sconce’s attachment to the wall. Use tape to secure the wires in place if necessary.
The final step is to attach the lampshade to the sconce. This is usually the easiest part of the process, as many sconces come with pre-assembled shades.

If you have a removable shade, now is the time to attach it and complete the installation. Source: 11 Magonolia Lane (6)
If your sconce requires assembly, carefully attach the shade according to the manufacturer’s instructions. Once the shade is in place, your sconce is ready to light up your space.
Choosing between DIY and professional installation depends on your budget, preferences, and the level of convenience you desire. Consider your needs and priorities to make the best decision for your lighting project.
DIY installation of wall sconces can be a cost-effective and flexible choice. By avoiding wiring, you save approximately $300 per fixture, making it an affordable option. The project is relatively simple, as it involves attaching sconces and securing puck lights without the need for electrical work.
However, this approach comes with its own set of challenges. Regular battery maintenance is required, and careful measurement and placement are crucial for a successful outcome. Additionally, DIY installations typically offer fewer design options compared to professionally wired fixtures.
Hiring a professional to install wall sconces offers several advantages, particularly if you're looking for a secure and permanent solution. Professionals ensure that the wiring is correctly handled and that the sconces are installed to high standards, providing a polished and reliable result.
Although the cost is higher, reflecting the labor and materials involved, it eliminates the need for battery replacements and simplifies the process. Professional installations are ideal for those seeking a long-term solution with minimal maintenance.
Can I hang a wall sconce with Command™ strips?
What are the rules for hanging wireless wall sconces?
How do you install a wall sconce without existing wiring?
Do you need an electrician to install wall sconces?
How to hang a sconce on the wall without drilling?
Can you get wall lights without wiring?
How do I add a light without wiring?
Do sconces have to be hardwired?
How long do wireless sconces last?
Can I install a sconce myself?
What is the best way to hang wall sconces?
Is it expensive to install sconces?
How to add sconces to a wall?
How do you anchor a wall sconce?
Do wall sconces need electricity?
Ready to brighten up your home with the perfect wall sconces? Rowabi hopes our guide has prepared you to transform your space effortlessly. Explore our collection and give your home a fresh, new look today!
Source of image:

How-To: Replace Your Incandescent Light Bulbs with LEDs
Is it hard to replace a traditional incandescent light bulb with LED? Definitely not! You can do it yourself with the right suggestions, and might gain more information about bulbs to choose your o...
Read more
How to Change a Light Fixture | 9 Easy Steps
Learning how to change a light fixture is one of the easiest ways to transform a room instantly. Whether you're replacing a dated fixture or adding a new statement piece, updating your lighting can...
Read moreGifting has never been easier
Perfect if you're short on time or are unable to deliver your gift yourself. Enter your message and select when to send it.
